1. 배포 환경
▪ GCP의 ComputeEngine을 서버로 사용
▪ Docker Compose로 Airflow Webserver, Scheduler, Worker, Redis, PostgresSQL 컨테이너 실행
▪ 서울시 권역별 실시간 대기환경 현황 데이터는 PostgreSQL custom에 적재

2. 환경 구성
▪ 아래 순서로 작업을 진행하여 환경을 구성
(1). GCP VM 인스턴스 생성하기 -> https://doodo0126.tistory.com/24
(2). Ubuntu에 Docker 설치하기 -> https://doodo0126.tistory.com/26
(3). Docker로 Airflow 설치하기 -> https://doodo0126.tistory.com/28
(4). 개발환경구성 (local 환경에 Python 설치) -> https://doodo0126.tistory.com/29
(5). 개발환경구성 (VScode 설치) -> https://doodo0126.tistory.com/30
(6). 개발환경구성 (Github 설정) -> https://doodo0126.tistory.com/31
(7). Local에 Airflow library 설치 -> https://doodo0126.tistory.com/32
(8). DAG 만들기 & DAG 디렉토리 설정 -> https://doodo0126.tistory.com/33
(9). Postgres 컨테이너 설치 및 네트워크 설정 -> https://doodo0126.tistory.com/34
▪ 환경 구성을 완료한 뒤 GCE의 프로젝트 디렉터리는 다음과 같음
SeoulRealtimeCityAir
├───config
├───dags
├───logs
├───plugins
├───.env
└───docker-compose.yaml
3. docker-compose.yaml 파일 수정하기
▪ csv파일이 저장될 디렉터리 생성
cd SeoulRealtimeCityAir
mkdir -p ./files
▪ dags, logs, config, plugins, files 디렉터리를 컨테이너와 연결하기 위해 다음과 같이 volumes 항목의 디렉토리 수정
▪ ${AIRFLOW_PROJ_DIR:-.}는 AIRFLOW_PROJ_DIR 환경 변수가 설정되어 있으면 그 값을 사용하고, 설정되어 있지 않으면 기본값으로 . (현재 디렉터리)를 사용
vi docker-compose.yaml

x-airflow-common:
  ...

  volumes:
    - ${AIRFLOW_PROJ_DIR:-.}/dags:/opt/airflow/dags
    - ${AIRFLOW_PROJ_DIR:-.}/logs:/opt/airflow/logs
    - ${AIRFLOW_PROJ_DIR:-.}/config:/opt/airflow/config
    - ${AIRFLOW_PROJ_DIR:-.}/plugins:/opt/airflow/plugins
    - ${AIRFLOW_PROJ_DIR:-.}/files:/opt/airflow/files
▪ Postgres와 Postgres custom 컨테이너에서 사용할 유저명과 패스워드를 .env 파일을 참조하도록 수정
vi docker-compose.yaml

services:
   ...

   postgres_custom:
       image: postgres:13
       environment:
         POSTGRES_USER: ${POSTGRES_CUSTOM_USER}
         POSTGRES_PASSWORD: ${POSTGRES_CUSTOM_PASSWORD}
         POSTGRES_DB: seoulair
         TZ: Asia/Seoul
       ...

   postgres:
      image: postgres:13
      environment:
         POSTGRES_USER: ${POSTGRES_USER}
         POSTGRES_PASSWORD: ${POSTGRES_PASSWORD}
         POSTGRES_DB: airflow
      ...
▪ .env 파일에 Postgres와 Postgres custom 컨테이너에서 사용할 유저명과 패스워드를 지정
vi .env

POSTGRES_CUSTOM_USER=[DB 유저명 설정]
POSTGRES_CUSTOM_PASSWORD=[패스워드 설정]

POSTGRES_USER=[DB 유저명 설정]
POSTGRES_PASSWORD=[패스워드 설정]
▪ Docker Compose를 사용하여 필요한 컨테이너들을 백그라운드에서 실행
sudo docker compose up -d4. 서울시 공공데이터 API 키 발급 받고 Variables에 등록하기
▪ 서울 열린데이터광장로 이동하여, 로그인 후 일반 인증키 신청
열린데이터광장 메인
데이터분류,데이터검색,데이터활용
data.seoul.go.kr

▪ 인증키 발급한 후에, 인증키 관리에 들어가서 발급받은 인증키 복사


▪ Airflow webserver에 접속한 후 [Admin] -> [Variables] 클릭

▪ [+] 눌러서 새로운 variable 추가
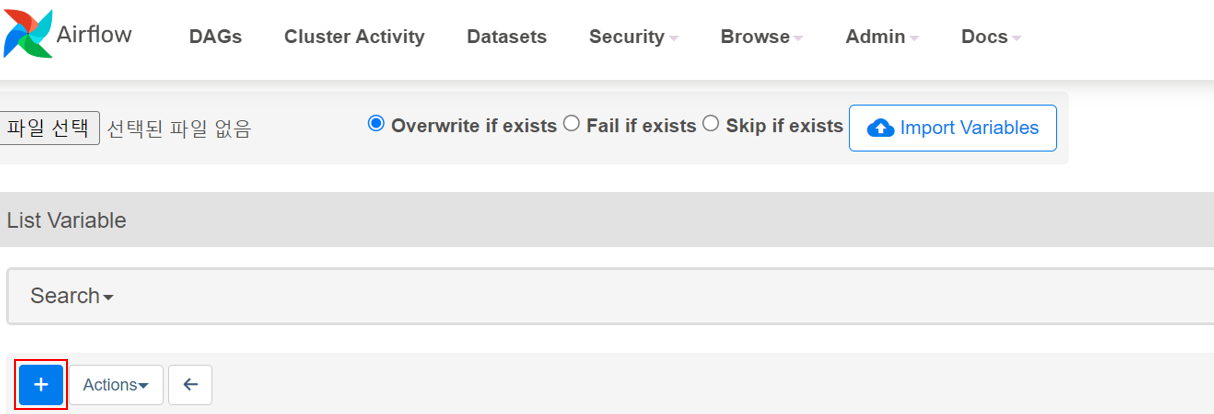
▪ [key]에는 "apikey_openapi_seoul_go_kr", [Val]에는 복사해둔 인증키 값 붙여넣고 [Save] 누르기

5. 서울시 공공데이터 HTTP를 Connections에 등록하기
▪ [Admin] -> [Connections] 클릭

▪ [+] 클릭해서 새로운 connection 추가

▪ [Connection id]는 "openapi.seoul.go.kr", [Connection Type]은 "HTTP"로 설정, [Description]은 해당 connection에 대해 설명하고 싶은 내용 적으면됨

▪ 샘플URL를 참고해서 [Host]와 [Port]는 각각 "openapi.seoul.go.kr", "8088"로 지정
▪ 모든 설정이 완료되었으면 [Save] 클릭


6. Postgres를 Connections에 등록하기
▪ 마찬가지로 [+] 클릭해서 새로운 connection 추가
▪ [Connection id]는 "conn-db-postgres-custom", [Connection Type]은 "Postgres"로 설정, [Description]은 해당 connection에 대해 설명하고 싶은 내용 적으면 됨
▪ [Host]에는 새로 만든 Postgres DB에 대한 고정 IP값 넣어줌
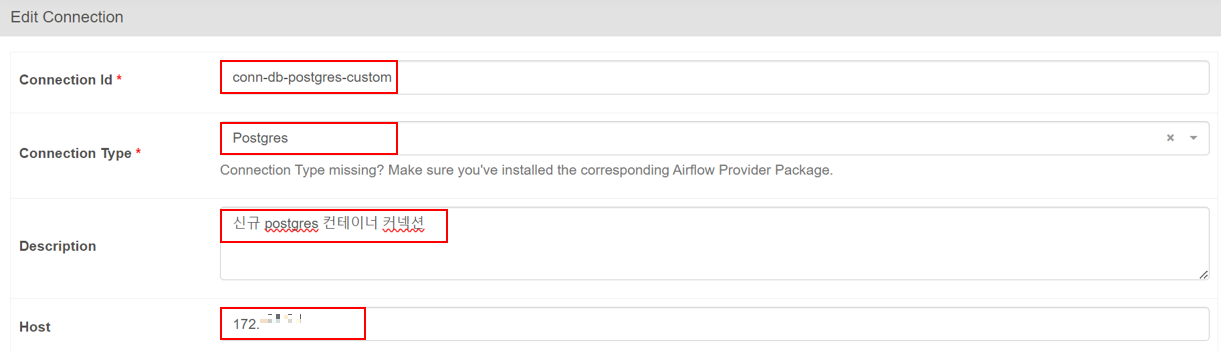
▪ [Database], [Login], [Password]에는 새로운 postgres 컨테이너 등록할 당시 만든 [DB 이름], [유저 이름], [비밀번호] 입력
▪ [Port]에는 "5432" 입력
▪ 모든 설정이 완료되었으면 [Save] 클릭

GitHub - dojun43/SeoulRealtimeCityAir: 서울시 대기현황 데이터 파이프라인 구축 프로젝트
서울시 대기현황 데이터 파이프라인 구축 프로젝트. Contribute to dojun43/SeoulRealtimeCityAir development by creating an account on GitHub.
github.com
'프로젝트 > 서울시 대기현황 데이터 적재 프로젝트' 카테고리의 다른 글
| [서울시 대기현황 데이터 적재 프로젝트] Streamlit으로 Dashboard 만들기 (4) (1) | 2024.09.26 |
|---|---|
| [서울시 대기현황 데이터 적재 프로젝트] Terraform으로 배포 환경 구성하기 (3) (1) | 2024.09.18 |
| [서울시 대기현황 데이터 적재 프로젝트] Dag 생성하고 실행하기 (2) (0) | 2024.01.16 |